Thursday, June 25, 2009

Splittermuster Camo Paint Formula

These posts will serve as an online reference for the various camouflage paint schemes that I use. While I do not claim to have developed these all by myself, I have tried to present them here as simply and clearly as possible. I remember spending hours searching the Internet for a decent technique or color reference and hopefully this will serve to hasten the efforts of others.

Unless otherwise noted I use Vallejo Model Color almost exclusively for my Imperial Guard.


Copyright note: Unless they are mine, I make no claims of copyright to any pictures or examples, nor is it my intention to do so. They are used here because they represent the best examples I could find of a particular paint or camo style. If a picture belongs to you and you don't want it shown here, I'll take it down...just let me know


Splittermuster

This pattern is usually associated with the German airborne, the Fallschirmjager. I think it works pretty well on GW Steel Legion minis.


BASE COLOR
ratio 6:3:1

819 Iraqi Sand

986 Deck Tan

872 Chocolate Brown

RED BROWN
ratio 7:3

846 Mahogany Brown

872 Chocolate Brown


MEDIUM GREEN
ratio 5:3:2

888 Olive Grey

808 Blue Green

986 Deck Tan


I've found that the key to this pattern is to keep the brown and green in geometric shapes. Avoid round edges or clumpiness. Follow up the shapes with small, defined lines of the green. I use the pointed tip of a 20/0 brush for this. Whereas some would stick to putting these lines only over the tan areas, I like to go all the way through with very thin, controlled streaks that run the length of the model. Don't clump the lines too close together, from a distance it will still look cohesive. Remember, you cannot achieve the same detail on these camos as in real life. Shoot for a good, consistent paint job. Below are some very good examples.


Lastly, don't be intimidated by the complexity of these paint schemes. With patience and persistence you will be able to do it.

The war goes on,
Hessler

Titan Knight (5)

After some constructive input from Itkovian, I took another look at the whole "turret thing" and decided to go for the chin-mounted HBs. I covered the turret opening with another piece of thin plasticard and removed the headlamps on the front of the chassis.


I borrowed the exhaust from a Catachan sentinel and plopped it on the back of the chassis.


So here it is...again...ready for primer...I think...


I will prime this black as I intend to then go over it with a base coat of Fortress Grey. This model will also be my first attempt at some of the fun weathering techniques shown the the Imperial Armour Masterclass book. I HIGHLY recommend it. But first, I will need to look into an airbrush...


The war goes on,
Hessler

Wednesday, June 24, 2009

Titan Knight (4)

After a long weekend in the country, I am finally focused on getting some of these projects built and painted. Here is the final production post on my titan-knight. I finally settled on a lesser known variant called the Castellan. It boasts a battle cannon, twin-linked autocannons, and a chin-mounted, twin-linked heavy bolter.


What I've done above is create a cover plate out of plasticard to facilitate the smaller Predator-style turret. The whole was basically hand cut until the turret fit snugly.


This is the left arm, kitted out with the twin-linked autocannons. Just a simple job of taking a couple ACs(I finally have a use for these) from an IG Heavy Weapons sprue. The existing ports in the arms allowed them two fit almost perfectly.


I did the old "snip, snip" on the Predator lascannons and swapped in a couple heavy bolters. My only thought about the turret is that the stats on the Castellan call for the HB to be chin-mounted, indicating that they are fixed in position. So should I ignore that and keep the turret in a "fixed" position? The other option would be to literally mount the HB on the chin of the model, which would also look good.


My officer of the fleet serves as an example of the scale for all the weapons and upper body of the titan-knight. I think all is done with possible exception of some banners on the arms.


As always, C&C is welcome...

The war goes on,
Hessler

Tuesday, June 16, 2009

From The Workshop: Magnifier

How can anyone not love this little beauty? For years I struggled to see the finer details of my 28mm friends as I painted them. I would see these magnifiers in the store and think "someday..."

I finally went for it and WOW, what a huge difference. Where as I used to hold a mini up close to my face, I can now hold it at arms length with the same detail revealed. That, in turn, allows me to capture more light as I'm painting. Also, for what its worth, sit by a window when you paint. Painting in the sunlight offers a much truer sense of how your colors look.

I cannot imagine doing this hobby with out these. I challenge you to try them, you may not ever take them off. Also, they kinda look like the goggles from the SM Scouts (oh yeah!)

The war goes on,
Hessler

Mini Test : Pig Iron

This time I have tinkered with the Kolony Rebels from Pig Iron. The first thing that appealed to me was the "greatcoat" look of the figures. To date, these are the best non-GW option for a 40K greatcoat army. As you can see in the pictures below, the detail is great.


In order to give these an acceptable level of 40K'ness, I have snipped off the front 1/4 inch of the gun and replaced it with the barrel portion of a IG lasgun. On the left I have used a Catachan barrel and the right sports the Cadian barrel. I can think of no better IG icon than the trusty lasgun, it really makes the figures seem easier to accept.


Also I have swapped out the heads with the Pig Iron Kolony Winter heads. These guys are primed and ready to get in the painting line (good lord, that line is getting long).

All in all, I give these a thumbs up. At some point in the distant future I will be making a full army from these, as they have officers, assault weapons, and heavy weapons figures that match up rather nicely with IG loadouts. But that will all have to wait for now.

If you have any comments or questions about these minis, please feel free to let me know.

The war goes on,
Hessler

Mini Test : Wargames Factory

In my never ending quest for cool looking minis and potential IG regiments, I am willing to experiment with anything. This first mini test looks at the British Firing Line from the Zulu War range by Wargames Factory. The hint at the Praetorian Guard is obvious but how easily can one "40K" it?

Below I have assembled one of the figures in question. The main challenge from a modelling perspective, is that weapon swaps are rather difficult. The positioning of the hands doesn't allow form any "pistol grip" type weapons, like the standard IG lasgun. I added a lasgun from the FW Kreig Weapon pack and it fits rather nicely. The tricky part there is to be mindful of where you make your cuts on both the weapon and the figure.


A pack from the FW Cadian Squad upgrade kit fits in very well with the overall style of the figure and bulks it out a little so it can stand up to a GW guardsman. However, while it might be as wide as the real thing, it is not as tall. A side by side comparison proved our stand-in to be noticebly shorter.


All in all, these are a reasonable route to go if you are looking to field Praetorian Guard. Another option this kit offers is snipping off the heads and doing a head swap on a Cadian figure. It might be worth a try but I think it may be a little too small. If you go with at least a full squad or two, the numbers may offer some distraction from the shortness. And who can't use a few extra IG squads? I know I love 'em!


If you have any questions about these minis, feel free to comment or send me an email. I'll answer everything to the best of my ability.

The war goes on,
Hessler

Army Fluff: Wilde Männer


You can click Wilde Männer to hear the pronunciation
(this will take you to a different web site)

The Wilde Männer are a Germanic, tribal people that live in the untamed, forested areas of Sadoukad 16. They interact regularly with the civilized majority of the planet but manage to retain their own relative Independence, something they are fiercely proud of. Looked upon as simple, uneducated tribesman by the Imperium, the Sadoukad generals(and the Inquisition) have long known and respected the Wilde Männer as powerful psykers, capable of unleashing fearsome waves of warp-spawned destruction. When driven into the heat of battle, the Wilde Männer become so frenzied that they are able to ignore wounds that would bring a normal man to his knees. Often led only by their psychic powers, some Wilde Männer will cover their eyes or mouth in order to be guided by the mysterious energy that overtakes them on the battlefield. In spite of their great power, they rarely fall to the perils of the Warp, a fact that has been observed and pondered for decades.

Sunday, June 14, 2009

Psyker Battle Squad (1)


Bits Breakdown:
  • Body - WHF Empire Flagellant Warband
  • Heads - WHF Empire Flagellant Warband
  • Arms - WHF Vampire Counts Zombie Horde


Above is a pic of the Overseer, I went with Catachan arms on him to visually set him apart from the others. The Rambo arms and pose definitely give him a leader look. I think I'll try some tattoos on these guys. I've never tried that on anything this small.


Above is just a close up of one of my psykers. The zombie arms are a little out of proportion but they feel right when I take my fluff into consideration. Some background fluff for these guys can be found HERE.

The war goes on,
Hessler

Thursday, June 11, 2009

Rough Riders (1)

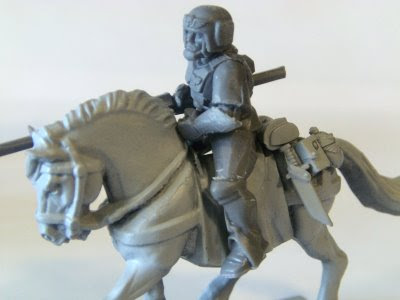
Finally got some pics up of my first rough riders. Up first is the RR Sgt:


Bits Breakdown:

  • Horse - WHF Empire Pistoliers
  • Legs - WHF Empire Pistoliers
  • Torso - Cadian
  • Lance/Arms - WHF Bretonnian Knightly Order
  • Heads - Mixture of Cadian & WHF Empire Pistoliers
  • Misc. Bits - Cadian sprues


The biggest challenge of the conversion has been filing down the right shoulder of all that armor plating. I still don't have it down to where I really want it. I think a better option might be found with a regular IG arm and swapping out the hand/lance. That would probably give less of a "knightly" look.


Although I have gotten all my misc. bits attached, I still need to scrounge a flamer and a meltagun for two of my riders, as well as some melta-bombs for the sergeant.


Although I really like the horse RR, I recently saw some very cool conversions done using the SM Scout bikes. I might take a stab at some of those.

I will be painting these with standard Vallejo German Uniform on the pants and the smock/helmet will be done in an Autumn Oak Leaf camo pattern. I will go with various shades of brown for the horses. If anyone has ever seen a reasonable tutorial on painting horses please send it my way.


The war goes on,
Hessler

Sunday, June 7, 2009

From The Workshop: "Third Hand"

A "third hand" or "helping hand" is invaluble to a hobbyist/painter. The use of the item should be rather self-explanitory but I can give a quick walkthrough.

These beauties have either 2 or 3 arms with multiple articulations on each arm. A heavy duty, springloaded clip is at the end of each arm. The base also has massive articulation, as well. All of these joints allow you to twist the clips into almost any position to hold almost any model or piece of a model.

Gluing two pieces together? Clip them up and they are held in place until your adhesive dries.
Get more info HERE.

Bottom line: An underated and useful tool.

The war goes on,
Hessler

HQ Command Squad (3)

I finally made a decision on how to equip the vets in my command squad so today I finished building the last pieces of my HQ choice. I will be going with a Vox caster and 3 plasmas. On foot, they can offer a way to deal with deep strike threats and when they are mounted in the chimera, they offer 3 mobile plasma shots to back up any units that may be in trouble.


Vox: The vox-catser itself comes from the FW command unit while the rest of the body is standard issue Cadian trooper. The head is from West Wind, WW2 German with field cap. That is the head I will use for my infantry platoon, as well. Check out their website HERE.


Plasma Gunner 1: Cadian torso & legs, arms/weapon is from the FW Death Korps weapon kit, the head is from the FW Cadian Upgrade kit.


Plasma Gunner 2: Cadian torso & legs, arms/weapon is from the FW Death Korps weapon kit, the head is from the new Cadian Command kit.


Plasma Gunner 3: Cadian Command torso & legs, arms/weapon is from the FW Death Korps weapon kit, head is from the FW Cadian Veterans Upgrade kit.

C&C is always welcome!

The war goes on,
Hessler
Friday, June 5, 2009

HQ Command Squad (2)

I put the modeling aside for a while and got into to paint mode today. I have started on my Company Commander, working to get all the base colors done first. A few things about my overall scheme: all the weapons will have a wood grain element worked in. I really like the old school look of a wood stock or handle on a futuristic weapon. The basic visual theme will be based on WW2 German army colors. The Waffen SS is famous for being one of the first units to effectively implement camouflage onto the battlefield. I will attempt to apply various SS camo schemes into the elements of my IG army. (NOTE: I don't condone anything about Nazis, facism, or any attrocities that occured in WW2. Please don't bother to bring it up.)


More HQ updates coming soon.


The war goes on,
Hessler

Thursday, June 4, 2009

Titan Knight (3)

Work continued on the Titan Knight today. I have decided to go with the Knight Paladin configuration. That means a Battle Cannon on the right, a twin-linked heavy bolter mounted on the body and a Dreadnought CC weapon on the left.

I managed to scrounge part of the cannon from the Shadowsword kit (I went with the Stormlord but that's another post). As shown below, it fit in the arm rather nicely.


Here's close up of the work I did on the arm. I just eyeballed the size and carefully cut out the circular shape with my trusty hobby knife. There is a particular blade available that suited the work perfectly. As with most mods like this, it takes a great deal of time and patience.


After dry testing the cannon, I went to work with the glue, basically "welding" the joints together with superglue. Another option would have been to use plastic glue but I get nervous using it on unique projects since it chemically bonds the plastic. That means "no mistakes".


The red lines below indicate where I will glue some small pieces of plasticard to square off the housing.


This project is turning out to be great fun. I think I see another of these in my future...


The war goes on,
Hessler

Command Chimera (1)


Here is a breakdown of my first Chimera. I have changed out the turret to make it serve as a Command Vehicle for my Company Command Squad. I started with a standard Chimera frame; the only change made was turning the gun ports into observation ports. Berks Warhammer 40K has a clever alternative for that using SM shoulder pads as covers. It makes them look like vents but I thought it looked cool. Take a look at it here.

I went with a heavy flamer on the hull as well as the turret. I swapped the turret out with a Predator style and attached 2 flamers from the Catachan Sentinel sprue. It only counts as the one heavy weapon but I thought it looked pretty sweet.


I have the FW Stormtrooper commander in the cupola and I improvised a vehicle command comm attachment by combining an icon from the tank sprue and a SM rhino radar dish. This particular turret can be switch out for a standard Chimera turret as needed.


The war goes on,
Hessler

From The Workshop: Economy Spray Booth

A spray booth gives you a dedicated place to apply spray primer, base color, and spray varnish. When I got back into the hobby a while ago, I decided I wanted some kind spray booth so I scoured the Internet and found many expensive, professional looking kits and some less expensive, homemade ideas. I suppose one has to balance features vs. cost. There can be a great satisfaction to buying the components and building it your self but the same satisfaction can be had by opening up a well-made, fancy kit. For me it came down to one thing...the smell of paint.

Many people I have read about have to deal with spraying indoors. That creates the need for some kind of exhaust system that leads to a nearby window. I am fortunate enough to have my own garage and that definitely offers some leeway. Spraying can occur anytime I want and the smell stays outside.

My booth is small but suitable for my needs. It consists of a medium size plastic tote and a plastic "lazy susan". For those who don't know, a lazy susan is a round disk set on small bearings; you can set food or condiments on it in the center of your table for easy access during meals. I just made sure that my lazy susan would sit flat on the side of the tote. My cost for both items was around $25. I found some old speaker stands in the garage and "boom goes the dynamite"...spray booth. I use some scrap cardboard to serve as a carrier to and from my booth.

For me, the bottom line on this project is: work smarter, not harder.

For those of you who want to go a few steps beyond what I have done, here is a link to a great example: Economy Paint Booth for Models

For those that want to look at some fancier kits, here is a link to follow:15"x20" Standard Spray Paint Booth. The link will take you to a very cool website called Micro-Mark. If you're like me, you will spend a lot of time checking out all the interesting tools they have for modeling.

The war goes on,
Hessler

From The Workshop: Primer

Primer...such an important part of painting good minis. There are lots of opinions about primer, what color to use, how to apply it. The bottom line is...use whatever works best for you. I normally use spray primer but I have also used brush-on primer in the past, as well. As far as color...I prefer grey. I have used black and white and I still use them when I am looking for a ceretain look. I assume that the basics of color choice are fairly well known so I'll summarize them quickly:

White will give a brighter undertone.
Grey will give an even undertone.
Black will give a darker undertone.

There are numerous articles and examples to be found on the internet, I'll let the reader dig further if you so desire.

I go with grey because it allows me to cleary see all the details of a mini as well as getting a touch of shading possibilities. All of my shading is done with washes after the basecolor has been applied.

My brand of choice switches between to brands: Design Master, available at my local craft store and The Armory, available at my FLGS. Both are about $6-7 and well worth it. Sometimes you have no choice but to pay $15(?) for a can of "Kaos Black" but, if you can, find a place that sells it for less.

Whatever color or technique to use, please make sure you use it. Trust me when I say...you will be saving yourself hours of frustration and disappointment.

Leave a comment and let me know how you approach priming.

The war goes on,
Hessler

Tuesday, June 2, 2009

HQ Command Squad (1)

My HQ Command Squad is well under way and with the new command squad kits, I have thoroughly enjoyed it so far. Here's a breakdown of composition and points:

Company Commander - Plasma Pistol, Power Fist, Carapace
4 Veterans - Vox, Medic, Regimental Standard, Sniper Rifle, Carapace
Regimental Advisers - 2 Bodyguards, Astropath, Master of Ordnance, Master of the Fleet
mounted in a command chimera - HF, HF, Extra Armor

Total Points = 332

Parts breakdown for my commander:
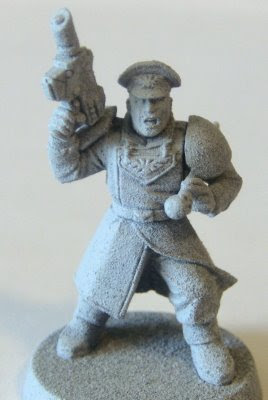
  • Torso/legs are the 1-piece combo from the Catachan command kit
  • The plasma pistol is glued on at the wrist and is from a SM model
  • The power fist is from the Cadian command kit
  • Head is from the Forge World veterans upgrade pack
  • The coat and the neck piece are from the WHF Pistoliers kit


The coat took quite a bit of time to get it to fit properly. I used a dremel(rotary tool) to slowly scrape out the material underneath the shoulders of the coat. It was a matter of scrape a little and check the fit, scrape a little and check the fit, over and over until it looked OK. If I remember correctly, I removed a little material from the models back also. I am partial to this head; I have had it for quite a while and I am glad I could finally use it.


Next are my 2 bodyguards...total bad-asses with scowls to match.
  • Heads are from the Cadian command kit
  • All the rest is from the Forge World Cadian command kit


Next is the Master of Ordnance. I felt like he should have a separate radio operator to follow him around and relay coordinates. During game play I intend to treat this a one model.
  • The Adviser's head is from the Forge World Cadian squad upgrade kit
  • All the rest of both minis is completely from the new Cadian command kit

Last but not least is my Master of the Fleet. Not much to talk about here; the entire mini is made from the Cadian command kit.


My next post will cover the 4 veterans and hopefully some painting.

The war goes on,
Hessler

Monday, June 1, 2009

Battlegroup Sadoukad Army List

The army list for Battlegroup Sadoukad will be posted as it comes together. Each element will be presented with a breakdown of content and points, as well as pics of conversions and painting. I feel like this will be easier to manage over the coming weeks.

I will be posting progress on each of these units as I get to them. Look over to the right for the progress lists. I will admit that I am a modeler more than a gamer but I intend to get out there and play a lot more. If you suggest a change to the list, please give feedback on what might work better


The war goes on,
Hessler