Tuesday, December 29, 2009

Hardened Veterans 01

Well it was great taking some time off and I hope everyone had a blessed Christmas. I painted up the first of a 10-man Vet squad; the 1st of 3 such squads I will be painting over the next months.


This veteran trooper, armed with a shotgun, is wearing a camo pattern from the Boadasil Campaign. Like all Sadoukadi veterans, has has adapted his camo to reflect the particular foliage and season of the battle. In this case it was late autumn during the battle for the Salinese Valley, just outside of the capital city of New Carson.

It was there that elements of Battlegroup Hessler, under the command of Col. Stephen Hessler, first clashed with the forces of Chaos. Using an elite, handpicked force of veterans and mechanized troops, Hessler brought the Emperor's wrath to the dogs of Chaos in what would turn out to be the first of many bloody, hard fought battles.

Anyways...hope you like. More to come as I continue to re-connect with my paintbrushes.

The war goes on,
Hessler

Saturday, November 28, 2009

I Went Down To The Crossroads...

I have come to a rather unpleasant crossroad, in regards to my Guard forces. From time to time I will look through an image archive I maintain for some painting inspiration. Today, as I was looking, I came upon and old painting commission I did for someone. The color scheme was meant to capture the look of Steel Legion, only the models were Cadian. Here's an example...


As I happily reminisced, my thoughts turned to my current troops project and my heart dropped. Bottom line...I don't like them. They have become overwhelmingly boring and it has been taking way too long to get even a squad completed. I suppose I brought it on my self, deciding to trim off ALL the shoulder pads and going with a certain direction with other details, like different heads that are metal (details are less defined) and trying to achieve a specific effect with some of the painting.

I am wondering whether I am simply bored with this color scheme, or if I am bored with painting all together. I had an idea is to start a different army for a spell but that doesn't sit well with me because I don't like to leave something unfinished.

And that's were I am right now. I am 80% done with my 2nd squad of troops and I still have the Command squad to finish. I don't really force myself to finish a painting project, but today I noticed I was becoming sloppy with the paint in an effort to get these done. I was trying to rush the process and it annoyed the hell out of me.

I will be taking a few weeks(maybe a whole month) off from painting to clear my head and get a better idea about what I will work on as I move forward. Ultimately, I want to be able to complete a project that I can set on the table and be happy to just look at it and know I did a good job. Maybe I will swicth between 2 different armies, possibly breaking things down into small, achievable pieces. Hmmm, not sure.

Has anyone out there ever come across this before? How do you deal with it? Should I go ahead and finish what I started before moving on? I am interested to know people's opinions.

The war goes on,
Hessler

Sunday, November 22, 2009

The IG Laboratory Bubbles To Life...

I have to admit it, lately I have been in more of a building mode than painting mode. Although I did get my 2nd squad primed, I was drawn back to the creativity of the workshop. I must confess, I really love the hobby aspect of this obsession of mine. So here is my latest creation...


These are 97% Pig Iron, bodies are the Ferals and the heads are the Kolony Militia with covered helmets. For the sake of something "official", I transplanted some DKoK lasgun barrels onto the ends of their weapons...I never really liked the Pig Iron weapons so there you go. In case anyone is wondering, I did try some Cadian heads on these and they were too big.

To me, these models scream Veterans with camo cloaks. I picture them as the vanguard of a Death World unit, infiltrating hazardous terrain and environments while looking for any and all targets of opportunity.

I think I will go with a Vietnam style camo/color palette. I might try my hand at some water effects to add that "I've spent the last 30 days in the rainy jungle" look. Here's a close up...


Also, just for kicks and giggles, I thew together a few more officers...

This one will either serve as my Platoon Commander or possibly as a Sgt. for a Vet squad. He just has that "veteran" look about him.


I've never had cause to build this "classic" greatcoat officer so I made one, just so I can say I did. He needs something more...just not sure what.


I raided a few different kits for this Vox Operator. He will serve well, whether at the Platoon level...or higher.

Guess that's it for now. Cheers to my fellow bloggers across the pond and Happy Thanksgiving to my fellow Americans. Here's to turkey and more turkey.

The war goes on,
Hessler

Friday, November 13, 2009

Drop Troops Test Mini

Assembly on my 2nd squad of troops is finished and I have completed the test mini for my new drop troops. Here's a pic to get things going...


I have used Pig Iron Heads, but gone with a lesser used style...they all have a bulkier helmet with mouth pieces. The grav-chutes are from Hasslefree. Legs, torso, and arms are Tau and the Las Carbine is a modified Catachan weapon.


I went with Tau components for several reasons. They suggest a slighter physical build than the Cadian models; this fits in perfectly with the fluff for this unit. The poses seem to convey a sense of alert, which is how one would be when dropping through the sky into the middle of a battlefield. The leg and shoulder "pads" represent a lighter version of flak armor, something that airborne/drop troops would favor.


I did some minor surgery on the Tau scanner and added some wire to make it more Imperial...at the very least, less Tau.


And, as an added bonus on this fabulous Friday the 13th, I received 3 Cadian Command Squad kits. These will be put through some serious paces this weekend...I intend to finish my infantry platoon and possibly start to work on some other unfinished elements of my army, namely more tanks.


That's it for now, everyone have a smashing weekend.

The war goes on,
Hessler

Thursday, November 5, 2009

Still, I Walk Among You

I am still alive and still working on my precious IG. My business has swelled recently and I have been overloaded. I relax from that by watching zombie movies and, unfortunately, 40K work proceeds at a very slow pace. My second squad of troops is assembled and work on the Command Squad will proceed in the next week or so. Also, I have finalized my plans/designs of my drop troops and have finished work on the first "prototype". I will be posting some pictures just as soon as I can.

Cheers to all and keep fighting the good fight.


The war goes on,

Hessler

Tuesday, October 20, 2009

Tanks & Troops

I have finally got caught up and was able to get some stuff painted and pics taken. The bits market has been blowing up and I am just able to keep myself caught up.

First, a few pics of my Vanquisher. She features the GW Tank Commander from their website that will serve as my version of Pask. Also featured are the Mars Alpha hull and Gryphonne Vanquisher turret, both courtesy of Forge World...


Up next is my first infantry squad. I will field a 2-3 squad platoon, supported by 2 heavy weapons squads and a special weapons squad.

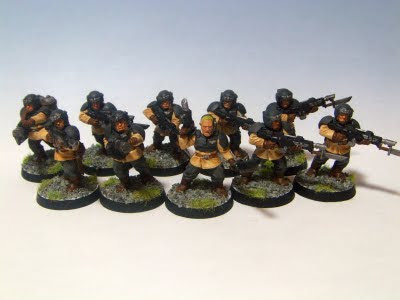
I give you the Sadoukad Terror Troops...


I used heads and packs from West Wind Productions and I trimmed off the shoulder pads to give a more basic style. This will be offset by my Veteran squads, who will have the full carapace armor.

Anyways, that's it for now. C&C is much appreciated.

The war goes on,
Hessler

Sunday, October 4, 2009

A Tank Builders Dilema...Sponsons?

I have seen evil and it's name is Forge World resin...without a doubt, the most frustrating modeling experience I have had. The Mars Alpha pattern Vanquisher fought me every step of the way but I have prevailed.

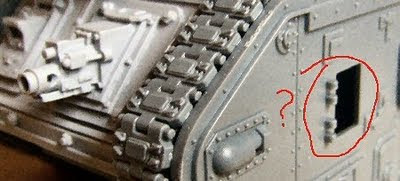
The Mars Alpha hull comes with the heavy bolter built in...so it stays there. The question now becomes: Since I already have some limited anti-personnel firepower, should I add sponsons with more bolters? Or should I leave the sponsons off altogether?

Here's some pics...


Below we see my answer to the turret being to small for the hull...layers of masking tape held in place by a coating of zap-a-gap...perfect fit.


Thanks in advance for your input.

The war goes on,
Hessler

Friday, October 2, 2009

Tanks...Now With Weathering!

My first 2 tanks have finally been moved to the "completed" column. All in all, I highly recommend the Tamiya Weathering Powders. They come 3 colors to a pack and there are 6(?) packs available, but I only use 4 of them...A,B,C, and D. The applicator looks like something from a make-up case, in fact I purchased 50 disposable make-up applicators off Ebay to make the process easier. The cost was $4. The weathering powders can go on very streaky so they need to be smoothed out with a larger, dry paintbrush.

I have listed the basic colors of my camo scheme in a previous post. The treads are painted similar to WW2 German forces...a dark red primer(Vallejo Cavalry Brown), followed by a dry brush of Gunmetal Grey, followed by a generous dry brushing of Tamiya Weathering Powder (in this case, Mud).

Other Tamiya powders used were Oil, Rust, Soot, etc. It warrants mentioning that there is really no correct way to apply these. I sprayed the whole model with Testors Glosscoat to make the weathering a little easier to manipulate. I also made some good use of GW Delvan Mud wash to create the rain streaks. My steaks are a bit longer than other examples I have seen, but they seems more realistic to me. Again...no real correct way to do this. After all the weathering was finished, I applied a spray of Testors Dullcoat to finish the entire process.


Anyways, enough of my yappin...


OGRYN CHIMERA TRANSPORT


LR COMMAND TANK


In my opinion, weathering needs to be approached in layers and you'll find that the only way to really get these techniques down is to pick up a tank and try it.

That's about it for now. Of course, C&C is appreciated and I'll be posting some more tanky goodness this weekend.


The war goes on,

Hessler

Thursday, October 1, 2009

Tank Madness

The forge masters of Mars have laid a blessing at the door of Sadoukad 16...


The Sadoukadi tank engineers will be hard at work this weekend to get these new components welded into a lovely Vanquisher. I think this one might have to include a certain "special" commander...


While I was snapping these pics I thought I'd share a snap of my two pals. Their full names are Jedi Master Obi-Wan Kenobi & Jedi Master Qui-Gon Jinn. Around here they are humbly referred to as Obi and Jinn-Jinn.


In other news, weathering is done on my first 2 tanks...pics to come tomorrow. Also, the Titan-Knight has finally received a coat of primer as well as 2 more tanks. It looks to be a BUSY weekend here in Sadoukad.

The war goes on,
Hessler
Friday, September 25, 2009

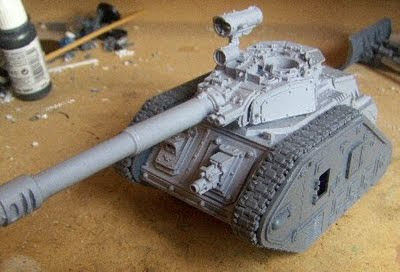
Tank Update (2)

Painting is coming along on my first 2 vehicles. I am trying to follow the steps laid out in the Forge World Masterclass book. I cannot recommend this book enough, it is full of techniques and tips that will help to elevate your painting. I also recommend the GW How To Paint Tanks, as well. I consider it a Masterclass "lite".

Anyways, the camo is done and all the small stowage has been painted. I also did a small base layer of paint chipping, using the sponge method. It took a few tries to get the technique down but practice makes things easier. Since my base color is so dark, I went with Vallejo Gun Metal for the chipping color, as opposed to a dark grey.


A coat of Testors Gloss Coat has been sprayed to facilitate the next weathering steps. I will be applying decals next and then begin weathering.

Here's some pics...


Here's some close ups of the "sponge" weathering I did. Overall, I'm pretty pleased with the way it has come out.


My next 2 tanks have been primed black and are awaiting the airbrush. The usual C&C is welcomed.

The war goes on,
Hessler
Saturday, September 19, 2009

Tank Update

The airbrush is working and although I am still learning to wield it properly, I can already see it's potential. I have posted some pictures below of the Ogryn Chimera and the LR Command Tank. This is based coated with Vallejo Air Color German Grey and the camo-stripe is Vallejo Model Color Dark Sand.

The airbrush allows for VERY exact control and precision, when used patiently. Because the paints must be thinned, they require several light coats. Trust me when I say...patience, patience, and more patience.

Anyways, some pics...


Overall, I am pleased with the result and in time I will have fewer mistakes. On these two I think I will have to go back and try to clean up some of the over spray and splatter. A few specks here and there of the tan seem to have gone to far into the grey areas.

Thanks for looking and C&C is always welcomed.

The war goes on,
Hessler